
ProductsAll Products
.NET Components
 Open Vision for .NET
 NOV Chart for .NET
 NOV Diagram for .NET
 NOV Rich Text Editor for .NET
 NOV Grid for .NET
 NOV Schedule for .NET
 NOV Gauge for .NET
 NOV Barcode for .NET
 NOV User Interface for .NET
 Vision for .NET
 Chart for .NET
 Diagram for .NET
 User Interface for .NET
 Vision for SSRS
 Chart for SSRS
 Gauge for SSRS
 Map for SSRS
 Barcode for SSRS
 Vision for SharePoint
 Chart for SharePoint
 Gauge for SharePoint
 Map for SharePoint
 Barcode for SharePoint
DownloadsAll Downloads
public sealed record Party(string Name, string Address1, string Address2,
    string Country, string Ein, string Email = "", string Website = "");

public sealed record InvoiceLine(string Code, string Description, string Period,
    decimal Quantity, string Unit, decimal UnitPrice);

public sealed record InvoiceData(
    string Number, DateTime IssueDate, DateTime TaxPointDate, DateTime DueDate,
    string CustomerReference, Party Customer, Party Supplier,
    IReadOnlyList<InvoiceLine> Lines, decimal SalesTaxRate, string Currency,
    string BankName, string RoutingNumber, string AccountNumber,
    string AccountType, string PreparedBy, string PaymentUrl);
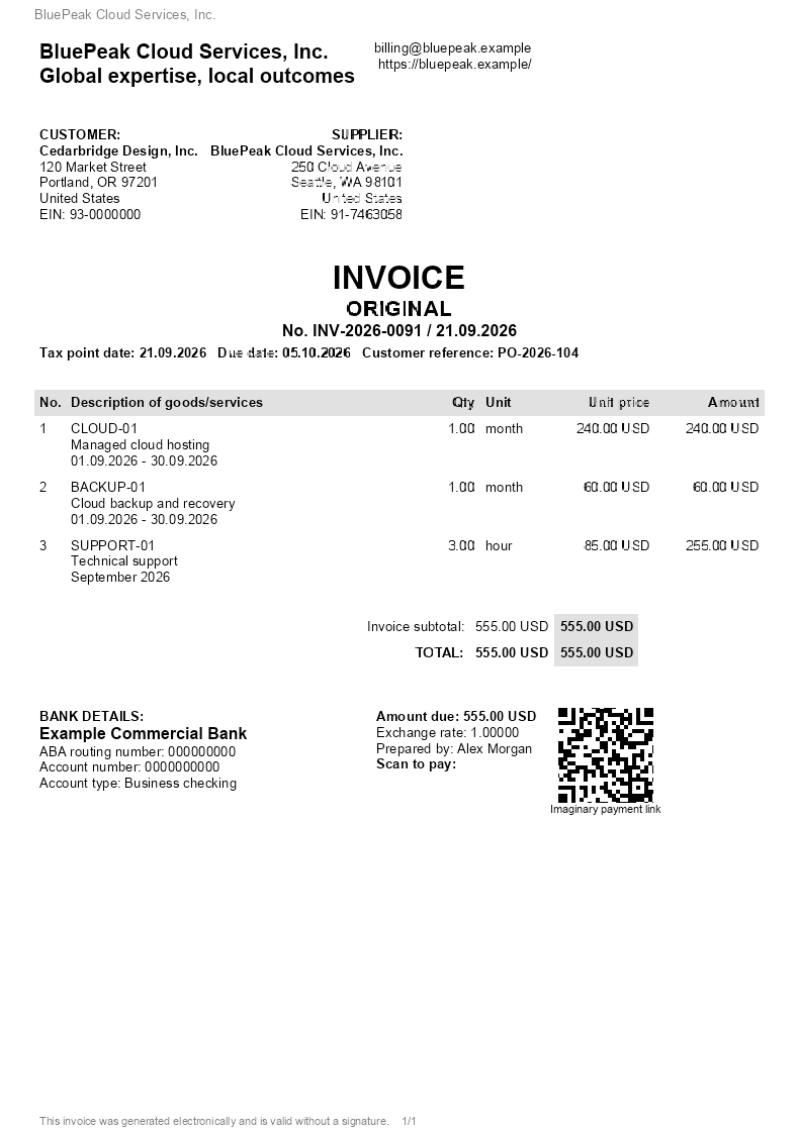
This simple model does not model the Supplier and Customer as different records, but more advanced models can make this distinction.
var supplier = new Party(
    Name: "BluePeak Cloud Services, Inc.",
    Address1: "250 Cloud Avenue",
    Address2: "Seattle, WA 98101",
    Country: "United States",
    Ein: "91-7463058",
    Email: "billing@bluepeak.example",
    Website: "https://bluepeak.example/");

// Pass supplier to the Supplier argument when constructing InvoiceData.
These are fictional contact details for the sample invoice. Monetary values are represented with decimal, which allows you to avoid floating/double precision loss when dealing with fractional numbers.
public static void CreatePdf(NRichTextView view, InvoiceData invoice)
{
    view.Content.Sections.Clear();

    var section = new NSection
    {
        PageSize = new NPaperSize(ENPaperKind.A4),
        PageMargins = new NMargins(36, 36, 36, 42)
    };
    view.Content.Sections.Add(section);

    AddHeader(section, invoice.Supplier);
    AddFooter(section);
    AddSupplierAndCustomer(section, invoice);
    AddInvoiceIdentity(section, invoice);
    AddLineItems(section, invoice);
    AddTotals(section, invoice);
    AddPaymentSection(section, invoice);
}
Keeping each logical part in a separate method makes it possible to change one part of the invoice without affecting the remaining document structure.
private static void AddHeader(NSection section, Party supplier)
{
    NHeaderFooter header = new NHeaderFooter();
    header.Blocks.Add(new NParagraph(supplier.Name));

    section.Header = header;
}
The repeating header uses the supplier's name, so the BluePeak sample remains consistently branded on subsequent pages. The footer in the complete source uses a two-column table. The left cell contains the electronic-invoice notice, while the right cell contains the page indicator.
brandParagraph.Inlines.Add(new NTextInline(x.Supplier.Name)
{
    FontSize = 15,
    FontStyle = ENFontStyle.Bold
});
emailParagraph.Inlines.Add(new NTextInline(x.Supplier.Email)
{
    FontSize = 10,
    FontStyle = ENFontStyle.Regular
});
websiteParagraph.Inlines.Add(new NTextInline(x.Supplier.Website)
{
    FontSize = 10,
    FontStyle = ENFontStyle.Regular
});
These excerpts show how to outline important information on the invoice by changing its formatting. The table containing customer/supplier
information is created as follows:
var parties = new NTable(0, 2)
{
    Border = NBorder.CreateFilledBorder(NColor.LightGray, 0.5, 0.5)
};

var partiesRow = new NTableRow();
Party[] partyValues = { x.Customer, x.Supplier };
string[] captions = { "CUSTOMER:", "SUPPLIER:" };
ENAlign[] alignments = { ENAlign.Left, ENAlign.Right };
Each party is converted to a sequence of paragraphs containing its name, address, country, and EIN. Applying alignment to the paragraphs keeps the customer block left-aligned and the
supplier block right-aligned. The full code of the AddSupplierAndCustomer method is:
private static void AddSupplierAndCustomer(NSection section, InvoiceData x)
{
    var contact = new NTable(0, 2)
    {
        Border = NBorder.CreateFilledBorder(NColor.LightGray, 0.5, 0.5)
    };
    contact.Columns[0].PreferredWidth =
        new NMultiLength(ENMultiLengthUnit.Percentage, 65);
    contact.Columns[1].PreferredWidth =
        new NMultiLength(ENMultiLengthUnit.Percentage, 35);

    var contactRow = new NTableRow();

    var brandCell = new NTableCell { Padding = new NMargins(5) };
    var brandParagraph = new NParagraph
    {
        HorizontalAlignment = ENAlign.Left,
        Margins = new NMargins(0, 0, 0, 1)
    };
    brandParagraph.Inlines.Add(new NTextInline(x.Supplier.Name)
    {
        FontSize = 15,
        FontStyle = ENFontStyle.Bold
    });
    brandCell.Blocks.Add(brandParagraph);

    var sloganParagraph = new NParagraph
    {
        HorizontalAlignment = ENAlign.Left,
        Margins = new NMargins(0, 0, 0, 1)
    };
    sloganParagraph.Inlines.Add(new NTextInline("Global expertise, local outcomes")
    {
        FontSize = 15,
        FontStyle = ENFontStyle.Bold
    });
    brandCell.Blocks.Add(sloganParagraph);
    contactRow.Cells.Add(brandCell);

    var contactCell = new NTableCell { Padding = new NMargins(5) };
    var emailParagraph = new NParagraph
    {
        HorizontalAlignment = ENAlign.Right,
        Margins = new NMargins(0, 0, 0, 1)
    };
    emailParagraph.Inlines.Add(new NTextInline(x.Supplier.Email)
    {
        FontSize = 10,
        FontStyle = ENFontStyle.Regular
    });
    contactCell.Blocks.Add(emailParagraph);

    var websiteParagraph = new NParagraph
    {
        HorizontalAlignment = ENAlign.Right,
        Margins = new NMargins(0, 0, 0, 1)
    };
    websiteParagraph.Inlines.Add(new NTextInline(x.Supplier.Website)
    {
        FontSize = 10,
        FontStyle = ENFontStyle.Regular
    });
    contactCell.Blocks.Add(websiteParagraph);
    contactRow.Cells.Add(contactCell);

    contact.Rows.Add(contactRow);
    section.Blocks.Add(contact);
    section.Blocks.Add(new NParagraph
    {
        Margins = new NMargins(0, 0, 0, 14)
    });

    var parties = new NTable(0, 2)
    {
        Border = NBorder.CreateFilledBorder(NColor.LightGray, 0.5, 0.5)
    };
    var partiesRow = new NTableRow();

    Party[] partyValues = { x.Customer, x.Supplier };
    string[] captions = { "CUSTOMER:", "SUPPLIER:" };
    ENAlign[] alignments = { ENAlign.Left, ENAlign.Right };

    for (int i = 0; i < partyValues.Length; i++)
    {
        Party party = partyValues[i];
        ENAlign alignment = alignments[i];
        var partyCell = new NTableCell { Padding = new NMargins(5) };

        string[] lines =
        {
            captions[i], party.Name, party.Address1, party.Address2,
            party.Country, $"EIN: {party.Ein}"
        };

        for (int lineIndex = 0; lineIndex < lines.Length; lineIndex++)
        {
            var paragraph = new NParagraph
            {
                HorizontalAlignment = alignment,
                Margins = new NMargins(0, 0, 0, 1)
            };
            paragraph.Inlines.Add(new NTextInline(lines[lineIndex])
            {
                FontSize = 10,
                FontStyle = lineIndex < 2
                    ? ENFontStyle.Bold
                    : ENFontStyle.Regular
            });
            partyCell.Blocks.Add(paragraph);
        }

        partiesRow.Cells.Add(partyCell);
    }

    parties.Rows.Add(partiesRow);
    section.Blocks.Add(parties);
    section.Blocks.Add(new NParagraph
    {
        Margins = new NMargins(0, 0, 0, 16)
    });
}
var number = new NParagraph
{
    HorizontalAlignment = ENAlign.Center,
    Margins = new NMargins(0, 0, 0, 1)
};
number.Inlines.Add(new NTextInline(
    $"No. {x.Number} / {x.IssueDate:dd.MM.yyyy}")
{
    FontSize = 12,
    FontStyle = ENFontStyle.Bold
});
section.Blocks.Add(number);
Using separate NTextInline objects makes font size and font style explicit and allows additional text runs with different formatting to be added later.
var table = new NTable(0, 6)
{
    Border = NBorder.CreateFilledBorder(NColor.LightGray, 0.5, 0.5)
};

double[] widths = { 4, 49, 8, 9, 15, 15 };
for (int i = 0; i < widths.Length; i++)
{
    table.Columns[i].PreferredWidth =
        new NMultiLength(ENMultiLengthUnit.Percentage, widths[i]);
}
Afterward, the code loops through the headers:
for (int i = 0; i < headers.Length; i++)
{
    var cell = new NTableCell
    {
        Padding = new NMargins(5),
        BackgroundFill = new NColorFill(HeaderGray)
    };
    var paragraph = new NParagraph
    {
        HorizontalAlignment = headerAlignments[i],
        Margins = new NMargins(0, 0, 0, 1)
    };
    paragraph.Inlines.Add(new NTextInline(headers[i])
    {
        FontSize = 10,
        FontStyle = ENFontStyle.Bold
    });
    cell.Blocks.Add(paragraph);
    headerRow.Cells.Add(cell);
}
table.Rows.Add(headerRow);
and inserts each header as a table cell, by setting the font style to bold and applying a gray background. This is done to give the reader of the invoice a visual distinction
between the header and the line-item rows. The method then loops through InvoiceData.Lines, calculates each line amount from quantity and unit price, and inserts the formatted values into a new row:
for (int lineIndex = 0; lineIndex < x.Lines.Count; lineIndex++)
{
    InvoiceLine line = x.Lines[lineIndex];
    decimal amount = line.Quantity * line.UnitPrice;
    string[] values =
    {
        (lineIndex + 1).ToString(En),
        $"{line.Code}\n{line.Description}\n{line.Period}",
        line.Quantity.ToString("N2", En),
        line.Unit,
        $"{line.UnitPrice.ToString("N2", En)} {x.Currency}",
        $"{amount.ToString("N2", En)} {x.Currency}"
    };
    ENAlign[] alignments =
    {
        ENAlign.Left, ENAlign.Left, ENAlign.Right,
        ENAlign.Left, ENAlign.Right, ENAlign.Right
    };

    var row = new NTableRow();
    for (int columnIndex = 0; columnIndex < values.Length; columnIndex++)
    {
        var cell = new NTableCell { Padding = new NMargins(5) };
        foreach (string textLine in values[columnIndex].Split('\n'))
        {
            var paragraph = new NParagraph
            {
                HorizontalAlignment = alignments[columnIndex],
                Margins = new NMargins(0, 0, 0, 1)
            };
            paragraph.Inlines.Add(new NTextInline(textLine)
            {
                FontSize = 10,
                FontStyle = ENFontStyle.Regular
            });
            cell.Blocks.Add(paragraph);
        }
        row.Cells.Add(cell);
    }
    table.Rows.Add(row);
}
Descriptions can contain several paragraphs, which is useful for product codes, service names, and billing periods.
decimal net = 0;
foreach (InvoiceLine line in x.Lines)
{
    net += line.Quantity * line.UnitPrice;
}

decimal salesTax = Math.Round(net * x.SalesTaxRate, 2);
decimal gross = net + salesTax;
Sales-tax rows are added only when SalesTaxRate is greater than zero. The complete implementation places the totals table on
the right side of a two-column outer table and highlights the final amount cells with a gray background.
var qr = new NMatrixBarcode(
    ENMatrixBarcodeSymbology.QrCode, x.PaymentUrl)
{
    ErrorCorrection = ENErrorCorrectionLevel.Medium,
    PreferredSize = new NSize(92, 92)
};

var qrParagraph = new NParagraph
{
    HorizontalAlignment = ENAlign.Center
};
qrParagraph.Inlines.Add(new NWidgetInline(qr));
The surrounding three-column table shows bank details, payment summary, and the QR code containing the payment link. The source uses imaginary account information and an imaginary payment URL for demonstration purposes.NRichTextView richTextView = new NRichTextView(); NovInvoiceGenerator.CreatePdf(richTextView, invoice); richTextView.SaveToLocalFile(@"C:\Invoices\INV-2026-1042.docx"); richTextView.SaveToLocalFile(@"C:\Invoices\INV-2026-1042.pdf");


